Showing posts with label MS-Outlook Outlook Express. Show all posts

How to Configure POP3 / IMAP in Outlook 2007 - Example Gmail

To set up your Outlook 2007 client to work with Gmail:

  1. Enable IMAP in Gmail. Don't forget to click Save Changes when you're done.
  2. Open Outlook.
  3. For new setups, select Do not upgrade.
  4. Click Yes.
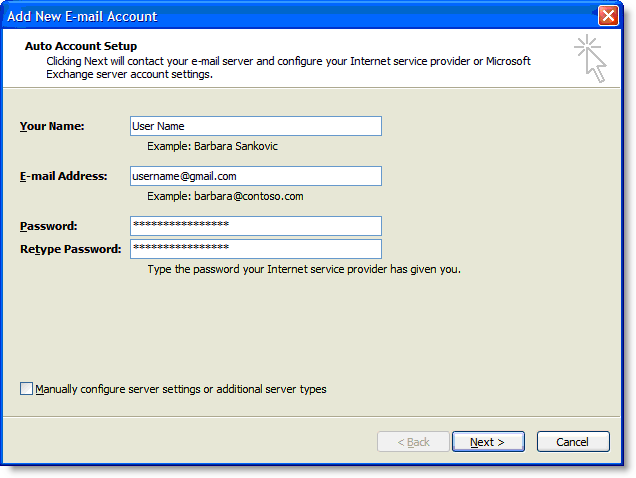
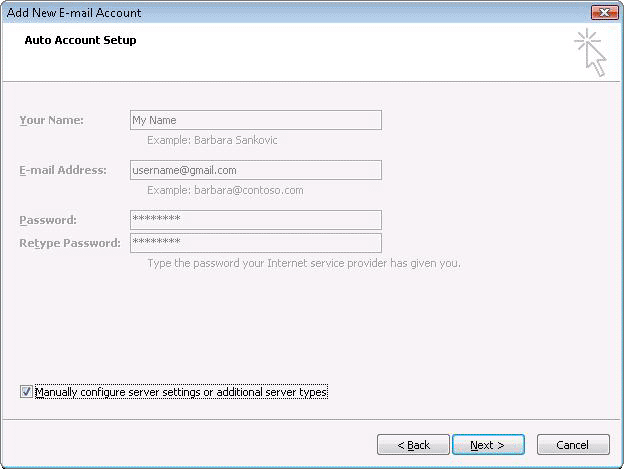
  5. Enter your display name, email address (including '@gmail.com'), and password. Google Apps users, enter your full email address, e.g. 'username@your_domain.com.'
  6. Select the 'Manually configure server settings or additional server types' checkbox.


  7. Select Internet E-mail.
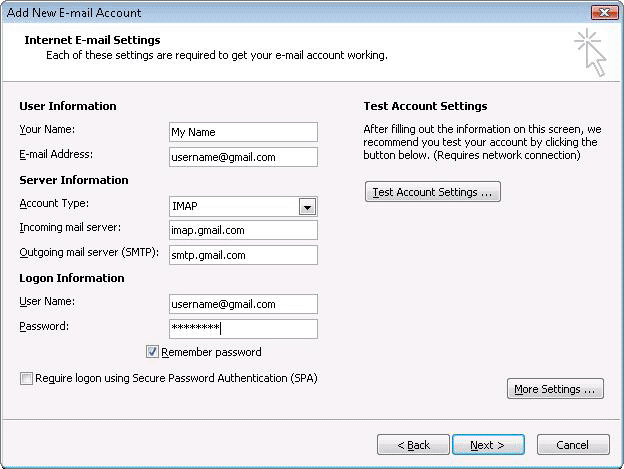
  8. Settings: name, full email address (including '@gmail.com' or '@your_domain.com')
    • In the Account Type dropdown menu, select IMAP. In the 'Incoming server name' section, enter: imap.gmail.com and in the 'Outgoing server name (SMTP)' section, enter: smtp.gmail.com.
    • In the 'User Name' field, give your full Gmail address, including '@gmail.com' or '@your_domain.com.'
    • After creating these settings, clicking Next takes you to the end of the setup.


  9. In the Tools menu, select Options then Mail Setup. Under 'Email Accounts,' click E-mail Accounts.
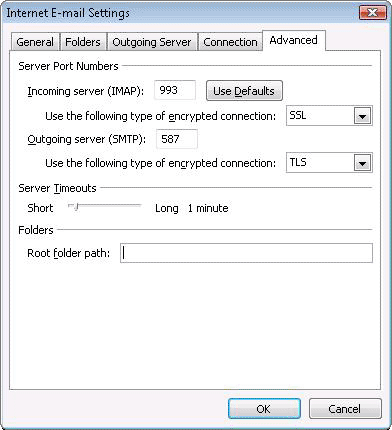
  10. Select an account, and click Change above the list of accounts. Click More Settings, then the Advanced tab.
    • Incoming server must be 993, and must use SSL encryption.
    • Outgoing server can use 587, TLS encryption.


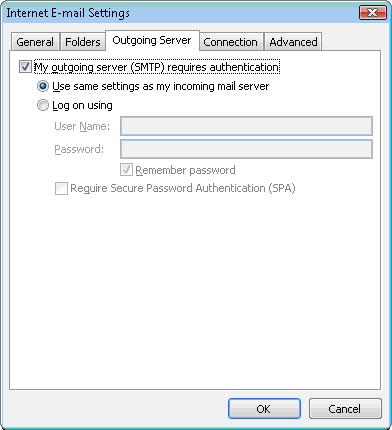
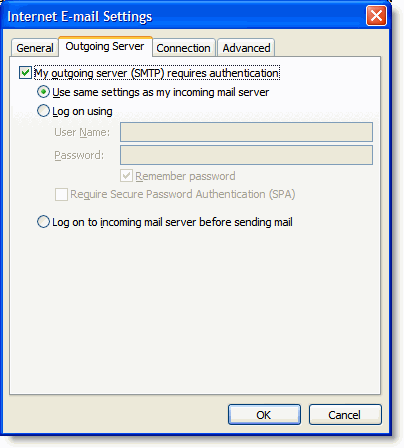
  11. Click the Outgoing Server tab. Make sure that 'My outgoing server (SMTP) requires authentication' is selected. The radio button 'Use same settings as my incoming mail server' should also be selected.


  12. Click OK > Next > Finish > Close > OK.
  13. Check our recommended client settings, and adjust your client's settings as needed.
-------------------------------------------------------------------------------------------------------------------------------------------------------------

To configure Outlook 2007 for your Gmail address:

  1. Enable POP in your email account. Don't forget to click Save Changes when you're done.
  2. Open Outlook.
  3. Click the Tools menu, and select Account Settings...
  4. On the E-mail tab, click New...
  5. If you are prompted to Choose E-mail Service, select Microsoft Exchange, POP3, IMAP, or HTTP, and clickNext.
  6. Fill in all necessary fields to include the following information:
  7. Your Name: Enter your name as you would like it to appear in the From: field of outgoing messages.
    Email Address: Enter your full Gmail email address (username@gmail.com). Google Apps users, enter your full address in the format username@your_domain.com.
    Password: Enter your email password.

    Manually configure server settings or additional server types: Leave this option unchecked if you want to automatically configure Outlook 2007. If you want to manually configure Outlook 2007, check this box now. Google Apps users should configure manually as follows.

    Enter name, email address, and password

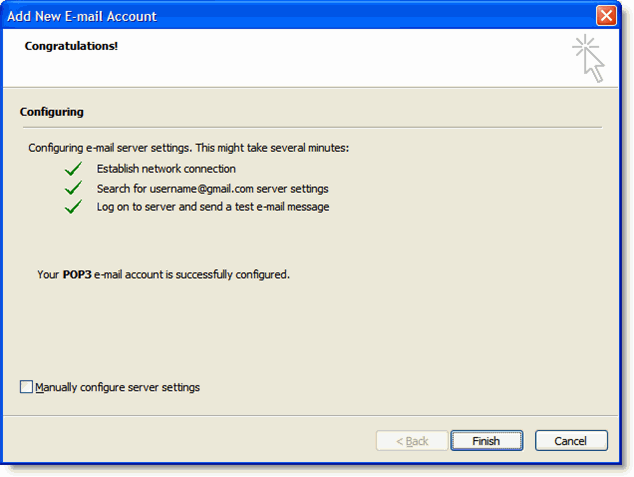
  8. Click Next. If you are configuring Outlook 2007 automatically, you're done! Just click Finish.
  9. Successful Configuration

  10. If you are configuring Outlook 2007 manually, select Internet E-mail and click Next.
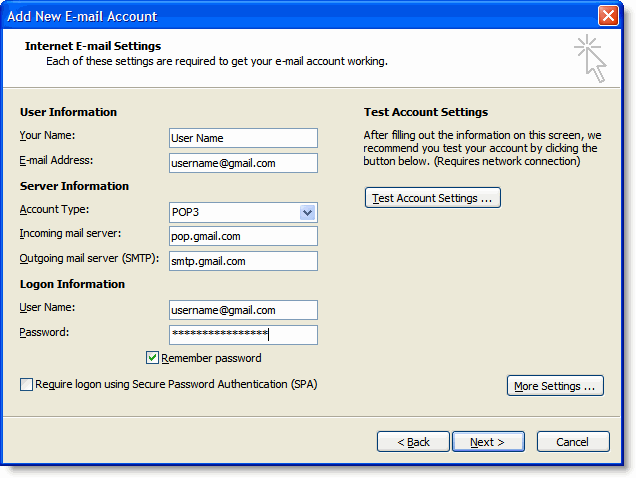
  11. Verify your User Information, and enter the following additional information:
  12. Server Information

    Account Type: POP3

    Incoming mail server: pop.gmail.com (Google Apps users, enter the server names provided, don't add your domain name in these steps)

    Outgoing mail server (SMTP): smtp.gmail.com

    Logon Information

    User Name: Enter your Gmail username (including @gmail.com). Google Apps users, enter your full address in the format username@your_domain.com

    Password: Enter your email password.

    Require logon using Secure Password Authentication (SPA): Leave this option unchecked.

    Account Settings
  13. Click the More Settings... button, and select the Outgoing Server tab.
  14. Check the box next to My outgoing server (SMTP) requires authentication and select Use same settings as my incoming mail server.
  15. Outgoing Server Tab

  16. Click the Advanced tab, and check the box next to This server requires an encrypted connection (SSL) underIncoming Server (POP3). Enter 995 in the 'Incoming Server' box.
  17. In the Outgoing server (SMTP) box, enter 587, and select TLS from the drop-down menu next to Use the following type of encrypted connection:.
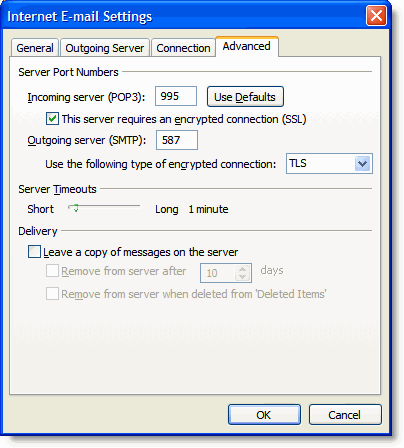
    Advanced Tab

  18. Click OK.
  19. Click Test Account Settings... After receiving 'Congratulations! All tests completed successfully', click Close.
  20. Click Next, and then click Finish.

Congratulations! You're done configuring your client to send and retrieve Gmail messages


Configuring New Outlook if existing not working properly


Click Start icon > Right click Outlook image > properties > show profile > create new profile
Type a name > choose appropriate POP3 or Exchange server options and click finish.


  • Step 1

    Click on the "Start" menu button on the Windows task bar (located at the bottom left corner of the Windows interface).

  • Step 2

    Click on "Control Panel." Double-click "Mail." If a profile does not exist already, then your software will bring up the mail dialog box. If there are one or more profiles already existing, then Click "Show Profiles." A list of profiles will appear in the window.

  • Step 3

    Click "Add." Select Microsoft Exchange Server," then click "Next."

  • Step 4

    Type a name in the "Profile Name" field. Click "Next."

  • Step 5

    Type the name of your server in the "Exchange Server" field.

  • Step 6

    Type your user name in the "Mailbox" field. Your user name comes before the "@." Click "Next."

  • Step 7

    Click "Finish."

  • Step 8

    Select your profile from the Mail dialog box. Click on "Properties."

  • Step 9

    Ensure that Microsoft Exchange Server is selected for that profile. Click on "Properties".

  • Step 10

    Click the button labeled "Check Names." When prompted, enter your user name and domain. Type in your password for the user name. Click "OK."

  • Step 11

    Select your profile at the bottom of the window when you are prompted to select a start up profile for Outlook. Click "Close." Close the Control Panel.

  • Step 12

    Double-click on the outlook icon on your desktop. Try logging in with your password. You will now be able to send and receive mail and news through your Outlook profile.


  • Restore Typed Address :

    Go to C:\Documents and Settings\Administrator\Application Data\Microsoft\outlook

    note : go to user profile

    In Windows Vista

    C:\users\Administrator\AppData\roaming\Microsoft\outlook

    find the Outlook.NK2 files, copy the file and paste in the same folder and rename the file as
    like your profile name Ex: "New" profile

    Now open Outlook > New post > Type the email address which saved in your previous profile
    will be shown.


    Recall or replace a message you've already sent

    You can recall or replace a message only if its recipient is logged on and using Microsoft Outlook and has not read the message or moved it from their Inbox.

    1. In Mail, in the Navigation Pane, click Sent Items.
    2. Open the message you want to recall or replace.
    3. In the message window, on the Actions menu, click Recall This Message.

       NOTE   This command does not appear unless you are using an Exchange e-mail account.

    4. Do one of the following:

      HideRecall the message

      HideReplace the message

     NOTE   To replace a message, you must send a new one. If you do not send the newitem, the original message is still recalled.

    Configuring Outlook 2007 for LDAP

    This document describes how to configure Outlook 2007 (for Windows) to access the campus LDAP (Lightweight Directory Access Protocol) server for directory service information.

    To Setup LDAP in Outlook 2007:

    1. Launch Outlook.

    2. Click on the Tools menu and select Account Settings.

      Outlook 2007 tools menu, select Account Settings
    3. Select the Address Books tab and click the New... button.

    4. Address Books tab
    5. Select the item titled Internet Directory Service (LDAP), and click Next to continue.

      Select Internet Directory Service(LDAP)
    6. In the Server Name: field, type ldap.services.wisc.edu and click on the More Settings...button.

      Directory Services (LDAP) Settings screen
    7. Clicking the More Settings... button might cause an Add E-mail Account warning to appear. Just click OK to continue.

      Possible warning message when adding account
    8. On the "Microsoft LDAP Directory" screen, click on the Search tab at the top.

    9. In the Search Base section, click Custom: and enter dc=wisc,dc=edu in the text field. Click the OK button.

      Search Base settings
    10. Click Next > and then Finish, and then close the "Account Settings" window to complete the setup.

    11. This service is now setup. Like the warning message said we need to restart Outlook before we can use this service, so close Outlook by choosing Exit from the File menu.

    To use the LDAP Directory Service in Outlook 2007:

    1. Launch Outlook. Click on the Tools menu, and select Address Book.

      Tools | Address Book
    2. Select Options from the Tools menu.

      Tools | Options
    3. For the option entitled "Show this address list first:", choose ldap.services.wisc.edu from the dropdown menu. Also, use the up and down arrows to position ldap.services.wisc.edu at the top of the list of address books. Click OK.

      Addressing Window
    4. Now when you're composing a new message, you can click the To... button to open the Select Names Window.

    5. Type your search terms in the text box and click the Go Button to perform an LDAP query. You can use the "Advanced Find" link if you wish to perform a more specific LDAP query.

      Select Names Window
    6. Select the recipients from the results of your search and use the To, CC, and BCC to add them to the message. When you have finished adding recipients to the message, click OK to return to the message window.

    How do I configure LDAP on Outlook on Exchange


    1. In Outlook click Tools then Email Accounts..., then select Add a new directory or address book


    2. Click Next, select Internet Directory Service (LDAP), and click Next.>


    3. Enter in ldap.columbia.edu as the Server Name and then click More Settings....

    4. Select the Search tab, and enter the Search base: o=Columbia University, c=us and click OK

    Restart Outlook after adding the ldap address book

    1. To access it, make a new email message, click on To:. Select ldap.columbia.edu from the Show Names from the: field.

    2. Click Advanced --> Find....

    3. Enter in the First Name and Last Name and click OK. Note: You can not use the Display Name field.