Installing a RAM DDR / SODIMM. Diff b/w RAM's Types and Speed and Amount of Mmry needed?

http://www.crucial.com/install/dimm.aspx

http://www.crucial.com/install/sodimm.aspx


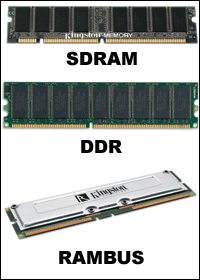
What is the difference between DDR2, DDR, and SDRAM?

Most desktops and notebooks use one of the three most popular types of synchronous dynamic random access memory (SDRAM) for the main system memory. Single data rate (SDR) SDRAM is the older type of memory, commonly used in computers prior to 2002. Double data rate (DDR) SDRAM hit the mainstream computer market around 2002, and DDR2-based systems hit the market in mid-2004.

DDR SDRAM is a straightforward evolution from SDR SDRAM. The big difference between DDR SDRAM and SDR SDRAM is that DDR reads data on both the rising and falling edges of the clock signal, so the DDR module can transfer data twice as fast as SDR SDRAM.

While DDR has a limited clock rate, the evolutionary changes to DDR architecture enable DDR2 to achieve speeds beyond that of DDR, delivering bandwidth of 5.3 GB per second and beyond! Because DDR2 is able to operate with faster bus speeds, your memory doesn't hold back the performance of your processor.

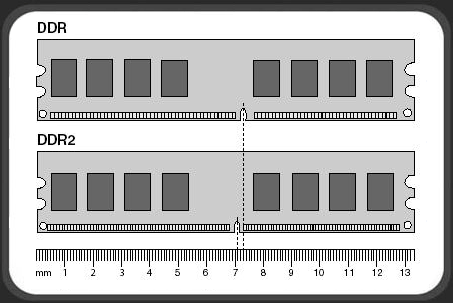
Generally speaking, motherboards are built to support only one type of memory. You cannot mix and match SDRAM, DDR, or DDR2 memory on the same motherboard in any system. They will not function and will not even fit in the same sockets.

The right type of memory to use is the one that your computer takes! The easiest way to find the right memory for your computer is to look up your system in Crucial's Memory Advisor tool. The Memory Advisor tool will list only compatible memory for your system.


What is the difference between PC2100 (DDR266), PC2700 (DDR333), and PC3200 (DDR400)?

Although these are all types of double data rate (DDR) memory, the varying numbers refer to the different speeds of memory your computer was designed for. Crucial no longer carries PC2100 (DDR266) memory, but PC2700 (DDR333) memory and PC3200 (DDR400) are backward-compatible with PC2100.

Memory is designed to be backward-compatible, so generally speaking, you can safely add faster memory to a computer that was designed to run slower memory. However, your system will operate at the speed of the slowest module or system component (the "lowest common denominator" effect).

One thing to keep in mind is that the memory does need to be the same type-for example, SDRAM cannot be mixed with DDR, and DDR cannot be mixed with DDR2. We recommend that you use the Crucial Memory Advisor™ or System Scanner tools to find the right memory for your computer.

How much memory do you need?

When it comes to adding system memory, the general rule of thumb is the more, the better.

Memory recommendations for how you use your system
OS software memory recommendations
Design software memory recommendations
Game memory recommendations

On average, doubling the amount of memory in your system will give you ample "space" to work and make an obvious difference in overall speed, especially with today's memory-hungry applications, such as office programs and graphics-intensive games. You'll be able to run more programs at once, and your system will be less likely to lock up or behave strangely. You'll also find it easier and faster than ever to edit graphics and sound. The bottom line is that adding memory makes your computer more efficient and allows you to do more things at once.

Here's what you do: Here's what you need:
Minor Administrative
Some word processing, occasional e-mail
384MB – 512MB
Fair Administrative
Word processing and e-mail, spreadsheets, fax and communication software, simple graphics programs, two applications open at once
384MB – 512MB
Intense Administrative/Student
Word processing and e-mail, spreadsheets, fax and communication business graphics, general gaming software, three or more applications open at once
384MB – 512MB
Executive/Management
Word processing and e-mail, spreadsheets, fax and communication software, presentation software, illustration software, photo editing, Web browser
512MB – 1GB
Professional and Gamer
Word processing and e-mail, photo editing, font packages and multimedia software, CAD software, CAM software, gaming
1GB – 2GB
Heavy Graphics Design
3-D CAD software, modeling software
2GB and up

OS Software
Software title Minimum requirements Crucial recommendations
Microsoft Windows® Vista™ 64-bit 2GB 2.5GB
Microsoft Windows® Vista 32-bit 1GB 2GB
Microsoft Windows® XP® Professional 128MB 512MB – 1GB
Windows XP Home 128MB 512MB – 1GB
Windows 2000 128MB 512MB
Mac® OS X 128MB 256MB

Design Software
Software title Minimum requirements Crucial recommendations
Adobe® Acrobat® 6.0 Standard 64MB 128MB
Macromedia® Studio MX™ 2004 256MB 512MB
Microsoft FrontPage® 2003 128MB 512MB
Adobe Illustrator® CS 128MB 512MB
Pinnacle® Studio™ Version 9 128MB 1GB – 1.5GB
Adobe Photoshop® CS 128MB 1GB – 1.5GB
Adobe Premiere® Pro 256MB 1GB +
Adobe After Effects® 6.0 128MB 1GB – 1.5GB

Games
Software title Minimum requirements Crucial recommendations
Half-Life® 2: Lost Coast™ 256MB 1.5 – 2GB
Battlefield® 2™ 512MB 2GB
Battlefield 2142™ 512MB 2GB
Call of Duty 2™ 512MB 1.5GB
Star Wars® Battlefront™ 2 512MB 1.5GB
F.E.A.R ™, F.E.A.R. Extraction Point 512MB 2GB
Company of Heroes® 512MB 1.5GB – 2GB
Neverwinter Nights™ 2 512MB 1.5GB – 2GB
Medieval II: Total War™ 512MB 1GB – 2GB
Need for Speed™ Carbon 256MB 1GB – 2GB
Tom Clancy's Splinter Cell: Double Agent™ 512MB 1GB – 2GB
Tom Clancy's Rainbow Six® Vegas 512MB 1GB – 2GB

(The OS, design, and games software specs on this page are current as of 11-15-06.)

The Crucial Memory Calculator
How does more RAM affect system performance? Explore our database of benchmark test results to see the impact of memory on various motherboard, processor, and operating system combinations.

If you build systems, the Memory Calculator can show you how much RAM to install for optimum performance.

What is the maximum amount of RAM the Windows operating system can handle?

That depends on two factors: the amount of memory your computer hardware can handle, and the amount of memory your Microsoft® Windows® operating system (OS) can handle.

First, your computer hardware (motherboard) is designed to hold a maximum amount of RAM. When you look up your computer in the Crucial Memory Advisor™ tool or scan your system with the Crucial System Scanner, you will see the system maximum listed on the page that shows the compatible upgrades for your system.

Second, the OS maximum is the maximum amount of memory that your particular version of Windows, Linux, or Mac® OS can handle.

When purchasing your memory upgrade, make sure that you do not exceed the lower of the two maximums (OS and computer maximums.) Too much RAM can lower your system's performance or cause other problems. (In most cases, the system maximum is lower than the OS maximum.)

Windows Vista (32 bit)

Ultimate: 4 GB

Enterprise: 4 GB

Business: 4 GB

Home Premium: 4 GB

Home Basic: 4 GB

Starter: 1 GB

Windows XP (32 bit)


Professional: 4 GB

Home: 4 GB

Starter Edition: 512 MB

Windows Server 2003 (32 bit)


Datacenter SP2: 128 GB

Enterprise SP2: 64 GB

Standard SP1: 4 GB

Datacenter R2: 128 GB

Enterprise R2: 64 GB

Standard R2: 4 GB

Web Edition: 4 GB

Small Business Edition: 4 GB

Windows Server 2008 (32 bit)

Datacenter: 64 GB

Enterprise: 64 GB

Standard: 4 GB

Web Server: 4 GB


Windows Vista (64 bit)


Ultimate: 128 GB

Enterprise: 128 GB

Business: 128 GB

Home Premium: 16 GB

Home Basic: 8 GB

Windows XP (64 bit)


Professional: 128 GB

Windows Server 2003 (64 bit)


Datacenter SP2: 2 TB

Enterprise SP2: 2 TB

Standard SP1: 32 GB

Datacenter R2: 1 TB

Enterprise R2: 1 TB

Standard R2: 32 GB

Small Business Edition: 128 GB

Windows Server 2008 (64 bit)

Datacenter: 2 TB

Enterprise: 2 TB

Standard: 32 GB

Web Server: 32 GB

Here are the OS maximums for some older versions of Microsoft Windows:


  • Windows 95: 1GB

  • Windows 98: 1GB

  • Windows 98SE: 1GB

  • Windows ME: 1.5GB

  • Windows NT: 4GB

  • Windows 2000 Professional: 4GB

  • Windows 2000 Server: 4GB

  • Windows 2000 Advanced Server: 8GB with PAE enabled

  • Windows 2000 Datacenter Server: 32GB with PAE enabled

Here are the maximums for some other platforms:


  • OS X (including v. 10.4 "Tiger"): 8GB due to current hardware limitations (the current maximum memory capacity of Apple's highest-end system, the Power Mac G5)

  • OS 9.x: 1.5GB (no single application can utilize more than 1GB)

  • Red Hat Linux 2.4 kernel: 64GB

DDR SDRAM

DDR SDRAM (double data rate synchronous dynamic random access memory) is a class of memory integrated circuits used in computers. It achieves nearly twice the bandwidth of the preceding [single data rate] SDRAM by double pumping (transferring data on the rising and falling edges of the clock signal) without increasing the clock frequency

With data being transferred 64 bits at a time, DDR SDRAM gives a transfer rate of (memory bus clock rate) × 2 (for dual rate) × 64 (number of bits transferred) / 8 (number of bits/byte). Thus with a bus frequency of 100 MHz, DDR SDRAM gives a maximum transfer rate of 1600 MB/s.

DR SDRAM for desktop computers DIMMs have 184 pins (as opposed to 168 pins on SDRAM, or 240 pins on DDR2 SDRAM), and can be differentiated from SDRAM DIMMs by the number of notches (DDR SDRAM has one, SDRAM has two).

DDR for notebook computers SO-DIMMs have 200 pins which is the same number of pins as DDR2 SO-DIMMs. These two specifications are notched very similarly and care must be taken during insertion when you are unsure of a correct match.

DDR SDRAM operates at a voltage of 2.5 V, compared to 3.3 V for SDRAM. This can significantly reduce power consumption. Chips and modules with DDR-400/PC-3200 standard have a nominal voltage of 2.6 Volt.

Like the ordinary SDRAM, DDR can be also classified into two types: 200MHz (100MHz DDR) PC1600 SDRAM and 266MHz (133MHz DDR) PC2100 SDRAM. The table below shows all the memory types available in the today's memory market:

Memory Frequency, MHz Memory Bus, bit Memory Bus Bandwidth, MB/sec Supported Platforms
PC100 SDRAM 100 64 800 Pentium III (i440BX, VIA Apollo Pro 133A, i815)
Athlon (AMD 750, VIA KT133)
PC133 SDRAM 133 64 1064 Pentium III (VIA Apollo Pro 133A, i815)
Athlon (VIA KT133)
PC800 RDRAM 800 16 1600 Pentium III (i820)
Dual Channel PC800 RDRAM 800 32 3200 Pentium 4 (i850)
PC1600 DDR SDRAM 200 64 1600 Pentium III (VIA Apollo Pro266, ALi Aladdin Pro 5)
Athlon (AMD 760, VIA KT266, ALi MAGiK 1)
PC2100 DDR SDRAM 266 64 2128 Pentium III (VIA Apollo Pro266, ALi Aladdin Pro 5)
Athlon (AMD 760, VIA KT266, ALi MAGiK 1)

SDRAM, DDR, RAMBUS

Chips and modules


Standard name Memory clock Cycle time I/O Bus clock Data transfers per second JEDEC standard VDDQ voltage Module name Peak transfer rate
DDR-200 100 MHz 10 ns [1] 100 MHz 200 Million 2.5v +/- 0.2v PC-1600 1600 MB/s
DDR-266 133 MHz 7.5 ns 133 MHz 266 Million 2.5v +/- 0.2v PC-2100 2100 MB/s
DDR-333 166 MHz 6 ns 166 MHz 333 Million 2.5v +/- 0.2v PC-2700 2700 MB/s
DDR-400 200 MHz 5 ns 200 MHz 400 Million 2.6v +/- 0.1v PC-3200 3200 MB/s


The memory modules exterior was also a bit modified. Although the DDR modules size remained the same, they have more pins - 184, while the regular PC100/PC133 SDRAM DIMM modules have only 168 pins.

Besides a larger number of pins, new DDR SDRAM DIMM modules feature lower voltage, 2.5V, which helps to reduce EMI (compare with 3.3V by the regular SDRAM). As for the latency, it is almost the same as by PC100/PC133 SDRAM modules and much lower than by RDRAM.

In addition to speed, DDR2 and DDR3 were developed to run at lower voltages than regular DDR RAM, resulting in less power needed to run memory. DDR used 2.5v. DDR2 runs off 1.8v and DDR3 1.5v.

gamers

A 184-pin DDR memory module


DDR Compared to DDR2

Chips and modules

For use in computers, DDR2 SDRAM is supplied in DIMMs with 240 pins and a single locating notch. DIMMs are identified by their peak transfer capacity (often called bandwidth).

Standard name Memory clock Cycle time I/O Bus clock Data transfers per second Module name Peak transfer rate
DDR2-400 100 MHz 10 ns 200 MHz 400 Million PC2-3200 3200 MB/s
DDR2-533 133 MHz 7.5 ns 266 MHz 533 Million PC2-4200
PC2-43001
4266 MB/s
DDR2-667 166 MHz 6 ns 333 MHz 667 Million PC2-5300
PC2-54001
5333 MB/s
DDR2-800 200 MHz 5 ns 400 MHz 800 Million PC2-6400 6400 MB/s
DDR2-1066 266 MHz 3.75 ns 533 MHz 1066 Million PC2-8500
PC2-86001
8533 MB/s

JEDEC standard modules

Standard name Memory clock Cycle time I/O Bus clock Data transfers per second Module name Peak transfer rate
DDR3-800 100 MHz 10 ns 400 MHz 800 Million PC3-6400 6400 MB/s
DDR3-1066 133 MHz 7.5 ns 535 MHz 1066 Million PC3-8500 8533 MB/s
DDR3-1333 166 MHz 6 ns 667 MHz 1333 Million PC3-10600 10667 MB/s[1]
DDR3-1600 200 MHz 5 ns 800 MHz 1600 Million PC3-12800 12800 MB/s


How to gain access to the System Volume Information folder - system resotre in cmd

Using CACLS with Windows XP Home Edition Using the NTFS File System

In Windows XP Home Edition with the NTFS file system, you can also use the Cacls tool, which is a command-line tool, to display or modify file or folder access control lists (ACLs). For more information about the Cacls tool, including usage and switches, search the Help and Support Center for "cacls."
  1. Click Start, click Run, type cmd, and then click OK.
  2. Make sure that you are in the root folder of the partition for which you want to gain access to the System Volume Information folder. For example, to gain access the C:\System Volume Information folder, make sure that you are in the root folder of drive C (at a "C:\" prompt).
  3. Type the following line, and then press ENTER:
    cacls "driveletter:\System Volume Information" /E /G username:F
    Make sure to type the quotation marks as indicated. This command adds the specified user to the folder with Full Control permissions.
  4. Double-click the System Volume Information folder in the root folder to open it.
  5. If you need to remove the permissions after troubleshooting, type the following line at a command prompt:
    cacls "driveletter:\System Volume Information" /E /R username
    This command removes all permissions for the specified user.

The following steps also work if you restart the computer to Safe mode because simple file sharing is automatically turned off when you run the computer in Safe mode.
  1. Open My Computer, right-click the System Volume Information folder, and then click Properties.
  2. Click the Security tab.
  3. Click Add, and then type the name of the user to whom you want to give access to the folder. Typically, this is the account with which you are logged on.
  4. Click OK, and then click OK again.
  5. Double-click the System Volume Information folder to open it.

Code:
cacls "C:\system volume information" /t /e /g %username%:F
be warned though this could take a while to execute depending on how many restore points there are.
to reverse it just type
Code:
cacls "C:\system volume information" /t /e /d %username%
just think of the possibilities... you could hide sensitive info, and porn there and no one would be able to access it Roflmao

Microsoft Windows XP Professional or Windows XP Home Edition Using the FAT32 File System

  1. Click Start, and then click My Computer.
  2. On the Tools menu, click Folder Options.
  3. On the View tab, click Show hidden files and folders.
  4. Clear the Hide protected operating system files (Recommended) check box. Click Yes when you are prompted to confirm the change.
  5. Click OK.
  6. Double-click the System Volume Information folder in the root folder to open it.

Windows XP Professional Using the NTFS File System on a Domain

  1. Click Start, and then click My Computer.
  2. On the Tools menu, click Folder Options.
  3. On the View tab, click Show hidden files and folders.
  4. Clear the Hide protected operating system files (Recommended) check box. Click Yes when you are prompted to confirm the change.
  5. Click OK.
  6. Right-click the System Volume Information folder in the root folder, and then click Sharing and Security.
  7. Click the Security tab.
  8. Click Add, and then type the name of the user to whom you want to give access to the folder. Choose the account location if appropriate (either local or from the domain). Typically, this is the account with which you are logged on. Click OK, and then click OK again.
  9. Double-click the System Volume Information folder in the root folder to open it.

Windows XP Professional using the NTFS File System on a Workgroup or Standalone Computer

  1. Click Start, and then click My Computer.
  2. On the Tools menu, click Folder Options.
  3. On the View tab, click Show hidden files and folders.
  4. Clear the Hide protected operating system files (Recommended) check box. Click Yes when you are prompted to confirm the change.
  5. Clear the Use simple file sharing (Recommended) check box.
  6. Click OK.
  7. Right-click the System Volume Information folder in the root folder, and then click Properties.
  8. Click the Security tab.
  9. Click Add, and then type the name of the user to whom you want to give access to the folder. Typically, this is the account with which you are logged on. Click OK, and then click OK again.
  10. Double-click the System Volume Information folder in the root folder to open it.

    NOTE: The System Volume Information folder is now accessible in normal mode to users of Windows XP Home Edition.

DNS Server Installation

DNS Server Installation


The DNS service (Domain Name Service) is the Achilles heel of an Active Directory structure. Since network communication is performed by only using names for reasons of understandability (e.g. www.tomshardware.com), there must be a quasi-permanent conversion between the names and the IP addresses that are behind them - and vice versa. A forward lookup searches for an IP address based on a name, while the reverse lookup searches for a computer name based on an address.

The installation of the DNS service is over in a jiffy (screenshot above), only it usually doesn't work as desired right from the start.


Function of a Reverse Lookup. Source: Microsoft.


It is very important to install a Reverse Lookup Zone. It is only with this that the DNS server also able to establish names based on IP addresses.


DNS Server Installation, Continued


For our purposes, we need a primary zone, because we want to serve our complete local network with the DNS server. Selecting the option for Active Directory integration at the bottom of the dialog box is important.


Of course, we enter the address space of our local network as a network ID. In this case it is 192.168.1.x. We left the subnet mask at 255.255.255.0, as it was before in the properties of the network connection so that we can include 254 computers in the network. This is enough for small and medium-sized companies. Changing it to 255.255.0.0 would expand the segment to 64,516 possible computers, or more specifically, 64,516 IP addresses (254 times 254).


We only want safe dynamic updates. Manual updates take a lot of effort and therefore this option is skipped for most applications.

After confirmation, the Reverse Lookup Zone is installed.


DNS Server Installation, Continued

The last thing we still need is a pointer, which points to our subnet 192.168.1.0.

Here, the fully qualified domain name of the server must be given, which is testserver.testdomain.com in this case.


The best way to check if the DNS configuration was successful is via an nslookup, a ping. So that addresses and names outside the local network can also be addressed, we must still inform the DNS server about which server is higher-ranking than it is for external requests.

For the sake of simplicity, we enter the IP address of our DSL router as the DNS forwarder. It will automatically forward requests to the DNS server provided by the Internet provider. You could also enter this directly here.


Configuring Outlook 2007 for LDAP

This document describes how to configure Outlook 2007 (for Windows) to access the campus LDAP (Lightweight Directory Access Protocol) server for directory service information.

To Setup LDAP in Outlook 2007:

  1. Launch Outlook.

  2. Click on the Tools menu and select Account Settings.

    Outlook 2007 tools menu, select Account Settings
  3. Select the Address Books tab and click the New... button.

  4. Address Books tab
  5. Select the item titled Internet Directory Service (LDAP), and click Next to continue.

    Select Internet Directory Service(LDAP)
  6. In the Server Name: field, type ldap.services.wisc.edu and click on the More Settings...button.

    Directory Services (LDAP) Settings screen
  7. Clicking the More Settings... button might cause an Add E-mail Account warning to appear. Just click OK to continue.

    Possible warning message when adding account
  8. On the "Microsoft LDAP Directory" screen, click on the Search tab at the top.

  9. In the Search Base section, click Custom: and enter dc=wisc,dc=edu in the text field. Click the OK button.

    Search Base settings
  10. Click Next > and then Finish, and then close the "Account Settings" window to complete the setup.

  11. This service is now setup. Like the warning message said we need to restart Outlook before we can use this service, so close Outlook by choosing Exit from the File menu.

To use the LDAP Directory Service in Outlook 2007:

  1. Launch Outlook. Click on the Tools menu, and select Address Book.

    Tools | Address Book
  2. Select Options from the Tools menu.

    Tools | Options
  3. For the option entitled "Show this address list first:", choose ldap.services.wisc.edu from the dropdown menu. Also, use the up and down arrows to position ldap.services.wisc.edu at the top of the list of address books. Click OK.

    Addressing Window
  4. Now when you're composing a new message, you can click the To... button to open the Select Names Window.

  5. Type your search terms in the text box and click the Go Button to perform an LDAP query. You can use the "Advanced Find" link if you wish to perform a more specific LDAP query.

    Select Names Window
  6. Select the recipients from the results of your search and use the To, CC, and BCC to add them to the message. When you have finished adding recipients to the message, click OK to return to the message window.

DHCP Server Installation

DHCP Server Installation


Once our server can resolve names and IP addresses and already works in Active Directory mode, only the DHCP server (Dynamic Host Configuration Protocol) is missing. By default, every windows computer looks for such a server in order to pick up its IP address, the Internet gateway and various other network parameters.

After service is installed via [Control Panel] - [Software] - [Windows Components] - [Network Services], it must be managed using the management console. Here, we need an IP address range (see screenshot above).


In turn, address spaces can be excluded from the address range.


The IP lease is a time value that stands for the validity of an IP address. In networks with only a few changes, this lease can easily be a month long, while the use of shorter leases (a few days) makes more sense in frequently changing systems.


Specifying an Internet gateway is very important for the users. In small environments, this is usually the DSL router.


DHCP Server Installation, Continued


Specifying a domain name as well as the DNS server is also important. Here, many DNS servers can be specified, if they are available. For reasons of reliability, the IP address of the DSL router can be given here so that the user can still connect to the Internet if the server crashes or is restarted.


If you didn't install the WINS server, then leave the text boxes empty. Otherwise, the same thing applies as for the DNS settings.


After successfully setting up an address range (scope), the DNS server still has to be authorized in order to work in the Active Directory. A right-click and the right choice of the respective item is all you need. The procedure only takes half a minute.


Finished - DHCP works! However, make sure that only one DHCP server is providing its services in the network. DSL routers often provide similar functions, which of course have to be deactivated.


How do I configure LDAP on Outlook on Exchange


  1. In Outlook click Tools then Email Accounts..., then select Add a new directory or address book


  2. Click Next, select Internet Directory Service (LDAP), and click Next.>


  3. Enter in ldap.columbia.edu as the Server Name and then click More Settings....

  4. Select the Search tab, and enter the Search base: o=Columbia University, c=us and click OK

Restart Outlook after adding the ldap address book

  1. To access it, make a new email message, click on To:. Select ldap.columbia.edu from the Show Names from the: field.

  2. Click Advanced --> Find....

  3. Enter in the First Name and Last Name and click OK. Note: You can not use the Display Name field.


2 old ways to increase Internet speed but very effective

First, you can read these posts:

* Speeding up internet does not require software
* How to speed up Internet connections

1 / Decrese bandwith for QOS-AWARE PROGRAMS: as default, Microsoft Windows only use 80% bandwidth for you to access the Web, while 20% use it for "QOS-AWARE PROGRAMS", this procedure will help you take advantage of the residual section that:

- Go to Start> Run, type gpedit.msc> OK.

- Find ComputerConfiguration> AdministarttiveTemplates> Network> Qos> Pack Schduler. Frame on the right, you double-click the Limit reservable bandwith, in the window displays you move through the Settings tab, check the Enable and type 0 in the frame Bandwith Limit (%), then OK. This reduced amount of bandwidth reserves from 20% to 0%.

2 / Edit TCPIP.SYS file: This file management of the Internet connection. First you need to download the file bat has the function of editing TCPIP.SYS here or here. Downloaded, unzip file and run Bat, type Y to agree, when asked to put the disk into the windows you click Cancel. Finally, press any key to close the DOS window, restart the computer.

When you want to go back to the old, you also open files on this bat, when asked, enter 10, press Y to return the old values.

P / S: 2 ways this is very, very effective and very easy to do, but only for Windows XP.